Beautify your markdown Nextjs blog with Highlightjs

Do you want your tech blog to have code highlighting features and make it look just like on Github? You too can easily get your markdown code segments color coded just like you see here on this blog. By following these simple steps you can add code beautifier / syntax highlighter to your own Nextjs markdown blog and your tech blog will look much nicer, easier to read and more professional.
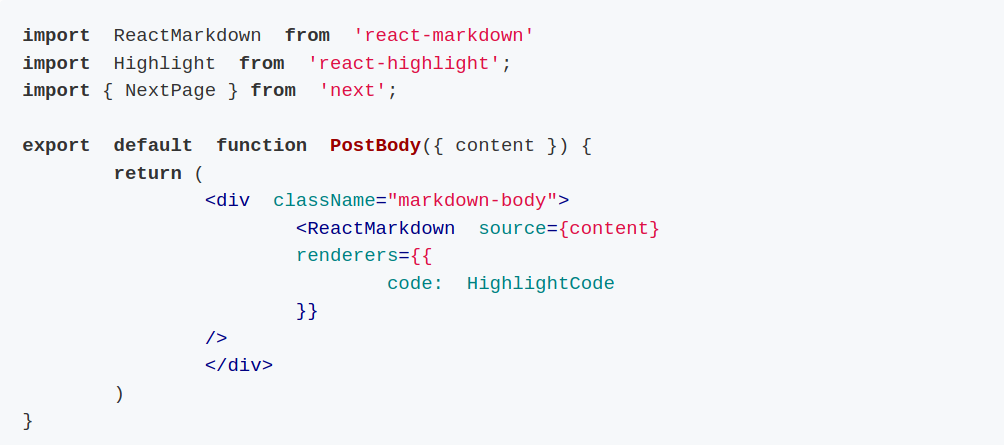
This is the code before we apply the code beautifier. This function takes inn the body, or the main text, of the blog as markdown text, and returns a HTML version of the markdown text using the library react-markdown.
Just want to copy/paste a solution?
If you just want to find a solution to copy/paste, install the packages and go down to Final Result to see the end result code.
Install the Needed packages
Now we want to add the beautifier to our code. First install react-highlight
npm install react-highlight --save
npm install highlight.js
npm install react-markdown --save
Before markdown highlighting
I have a file called post-body.tsx where I put this code.
import  ReactMarkdown  from  'react-markdown'

export  default  function  PostBody({ content }) {
	return (
		<div  className="markdown-body">
			<ReactMarkdown  source={content}  />
		</div>
	)
}
Choose your CSS styling
Now you need to select a CSS styling of your choice. I chose the standard GitHub styling, but you can choose whichever style suites you the most. Import this statement in your _app.tsx or _app.js file, or change the filename to the styling of your choice:
import '../node_modules/highlight.js/styles/github.css';
take a look at the highlight.js demo page for an easy and fast way to check out all the styling options you have: https://highlightjs.org/static/demo/
Add Code Beautifier / Highlighter
Now we can start to add the beautifier to our code. In the post-body.tsx file import the Highlight component. It is needed to wrap around the text we want to highlight, also import NextPage from the Nextjs library as it is needed by the ReactMarkdown component later on.
The new function HighlightCode wraps the input element in a Highlight component, this is needed for the last step.
import  ReactMarkdown  from  'react-markdown'
import  Highlight  from  'react-highlight';
import { NextPage } from  'next';

interface  HighlightCodeProps {
	markdown: any;
}

const  HighlightCode: NextPage<HighlightCodeProps> = ({ markdown }) => {
	return (
		<div>
			<Highlight>
				{markdown}
			</Highlight>
			<br  />
		</div>
	)
}
If you dont use TypeScript, do it like this instead
const  HighlightCode = ({ value }) => {
	return (
		<div>
			<Highlight>
				{value}
			</Highlight>
			<br  />
		</div>
	)
}
The <Hightlight /> component will parse the text and organize it into HTML elements and give each a class name that can be styled.
Now we need to modify the original function and add the new HighlightCode function we wrote to the ReactMarkdown renderer. Whenever the ReactMarkdown component identifies a "code" block in the markdown text, it calls the HighlightCode function with the text inside that markdown-block, so you can customize it however you want. You can also add any other type of markdown-blocks you want the ReactMarkdown to specially render, by adding it under code with a corresponding function, just like we did for the markdown-code block here.
export  default  function  PostBody({ content }) {
	return (
		<div  className="markdown-body">
			<ReactMarkdown  source={content}
			renderers={{
				code:  HighlightCode
			}}
		/>
		</div>
	)
}
The code parameter of renderers in requires a component with a <code> element that is inside a <pre> element to work. The <Hightlight /> component does this for us.
Final Result
Here you see the final result, if you want a quick copy / paste solution for your website.
import  ReactMarkdown  from  'react-markdown'
import  Highlight  from  'react-highlight';
import { NextPage } from  'next';

export  default  function  PostBody({ content }) {
	return (
		<div  className="markdown-body">
			<ReactMarkdown  source={content}
			renderers={{
				code:  HighlightCode
			}}
		/>
		</div>
	)
}

interface  HighlightCodeProps {
	value: any;
}

const  HighlightCode: NextPage<HighlightCodeProps> = ({ value }) => {
	return (
		<div>
			<Highlight>
				{value}
			</Highlight>
			<br  />
		</div>
	)
}
Now you should have a code beautifier. You can also create new functions that will custom render any other markdown-blocks you can think of.
Style other markdown blocks
For example here is a quick and dirty way to style your ordered or unordered lists, but this code assumes there are no subsists inside the list. You can add classes and style your lists as you wish:
export  default  function  PostBody({ content }) {
	return (
		<div  className="markdown-body max-w-5xl ">
			<ReactMarkdown  source={content}
				renderers={{
					list:  OrderedListBlock,
				}}
			/>
		</div>
	)
}

interface  ListBlockProps {
	ordered: boolean,
	children: any,
}

const  OrderedListBlock: NextPage<ListBlockProps> = ({ordered, children}: OrderedListBlockProps) => {
	const  list = children.map(val  => {
		return  <li>{val}</li>
	})

	if (ordered) {
		return  <ol  className="markdown-ol">{list}</ol>
	} else {
		return  <ul  className="markdown-ul">{list}</ul>
	}
}
Checkout here for all the different types you can use react-markdown to style however you like: https://www.npmjs.com/package/react-markdown#node-types
If you like this blog, checkout my blog about creating your own personal website with Github Pages,
Find more blogs about tech and Nextjs here https://sunde.dev/blog